
Because the only thing more important than making your vehicle go is making it stop.
We spend a lot of effort making sure your vehicle “goes” when you want it to. It should start immediately, run smoothly, accelerate fast when you need it, and zip on down the road safely at 70mph. All that goes out the window when a toddler chases a ball into the street right in front of you and your only concern is to STOP RIGHT NOW!
You don’t need to know the details of braking systems (that’s what we’re here for!) but understanding the basics helps you know when things are going right and what to look for to keep them from going wrong. If you’re having braking problems, wondering about possibilities, want to know more about brakes, or if you want to really understand a ‘brakes recommendation’ from one of our Service Advisors then this article is for you.
Speed into heat
Brakes… any kind of brakes… do an amazing thing each time you press the pedal. They translate all the energy of your moving, multi-thousand pound vehicle into heat energy in a matter of seconds. For the geeks out there the formula for Kinetic Energy is
![]()
This means the total energy of your vehicle is governed by how much it weighs and how fast it’s going in any particular direction. Heavier vehicles have more kinetic energy; vehicles going fast or on a downslope have more as well, which why it takes more effort to stop a Ford F-350 towing a trailer down Mt. Hood than it does to stop a Prius on a level residential street. Regardless of the total energy, your brakes dissipate it by converting it into heat through friction which is absorbed by the brake rotors and radiated as they cool.
When you stop a vehicle, it ‘noses down’ and transfers more of the vehicle weight to the front. That’s why your front brakes do much more of the work of stopping than the rears. This matters in how much your front brake pads last vs the back. Front brake pads can wear about twice as fast as rear pads!
The Basics of Brakes
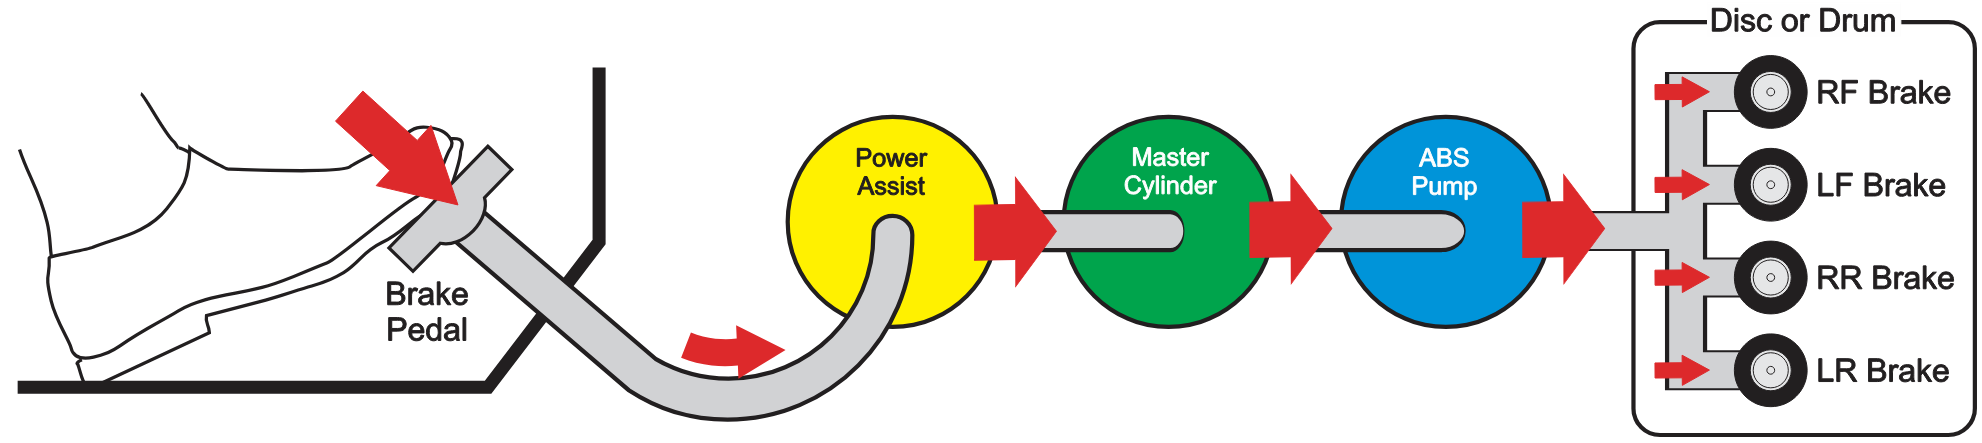
The specific ways they do this varies by vehicle, but there are some basic concepts across all models. In any vehicle, your brake pedal is connected to a line of components that amplify and distribute your force on the brake pedal to the mechanical stopping mechanisms at each wheel.
-
- Brake pedal- Not much to go wrong with a brake pedal! Just make sure your floorboard carpet doesn’t bunch up underneath it and keep you from pressing the pedal fully.
- Brake fluid- Your brakes are a hydraulic system that uses a fluid to transfer the force from your foot to the wheels. Brake fluid is hygroscopic, meaning it absorbs water if exposed to the air, so while brake fluid doesn’t get old it does need to be replaced when it absorbs too much water. Many shops do a ‘fluid flush’ to replace brake fluid on a time/mileage basis, but at Tom Dwyer we only flush the fluids when the moisture content of the fluid requires it. No need to pay for something until you need it!
- Power Assist Booster- This amplifies the tap of your toe to a force that can stop a car. Your brakes WILL WORK without the power assist, but not very well at all. You can feel what the power assist does by parking your car on a hill. Put the vehicle in neutral, don’t crank it, and release the parking brake. The car will slowly roll and you can stop it with your brakes, but you’ll feel how hard it is to make them work. This is an emergency feature; if your power assist module fails while driving, you’ll still have just enough brake control to stop the vehicle.
- Master Cylinder- This cylinder contains a piston that’s mechanically connected to the brake pedal. It pushes the fluid through the brake lines, the ABS pump, then to the brake systems at each wheel.
- ABS Module- Anti-Lock Braking Systems (ABS) became common in the US in the 90’s and have been mandated on all cars and light trucks since 2013. Your ABS system constantly monitors the wheels’ speed. If one wheel suddenly stops turning (as it can on ice, water, or in a very sudden stop) then the ABS cuts the pressure and reapplies it in an attempt to stop the skid. Pulsing the brakes on slippery conditions has always been safety advice, but a human can only pump the brakes a couple times a second at most while an ABS system pumps them 5-20 times each second. MUCH more effective!
- Disc or Drum brakes– After going through the Power Assist, Master Cylinder, and ABS Module, the force from your brake pedal is distributed to brakes at each of your four wheels.
Discs and Drums
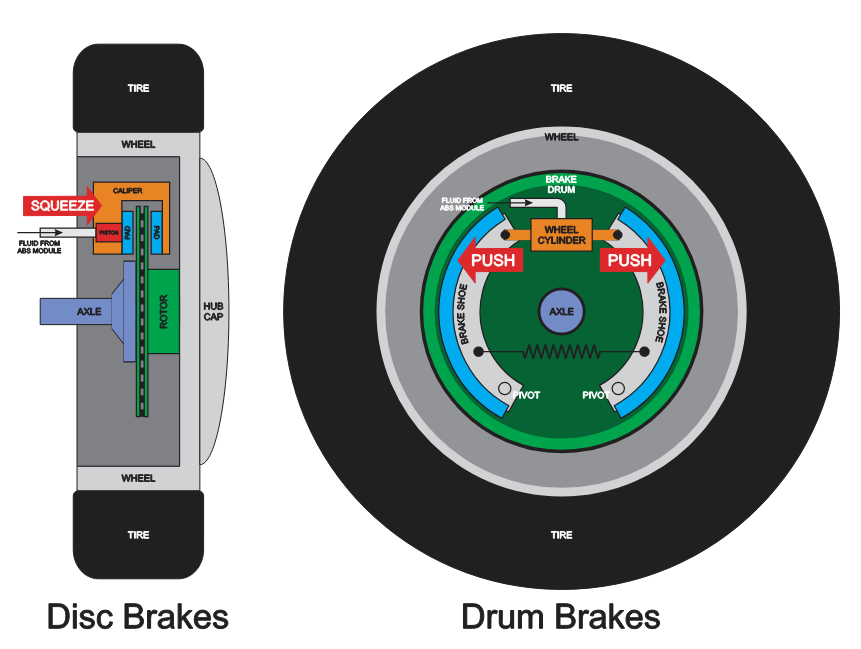
There are basically two types of brakes, disc and drum. Drum brakes were the standard until the 1950’s when almost all manufacturers switched to discs (especially on the front wheels) because discs are more reliable, have better heat dissipation, and are easier to access for repair and maintenance. There are one of these setups at each of your wheels.
Both disc and drum brakes work in the same way, but inside-out from each other. In both cases a metal part (“rotor” on disc brakes, “brake drum” on drum brakes) is attached to the axle; in disc brakes the rotor is shaped like a bowl and in drum brakes it’s shaped like a cylinder inside the wheel. Braking force comes from pushing a consumable material (blue) against the rotor or drum. In disc brakes, a piston (red) squeezes the rotor (green) between two brake pads (blue). In drum brakes, the wheel cylinder (orange) pushes the brake linings (blue) against the inside of the brake drum (green).
You’ll rarely see drum brakes on a modern vehicle. It’s good to understand how they work, but we’ll be talking about disc brakes for the rest of this article. (We’ve included info on Drum Brakes in our Digging Deeper section at the end of this article.)
Disc Brakes
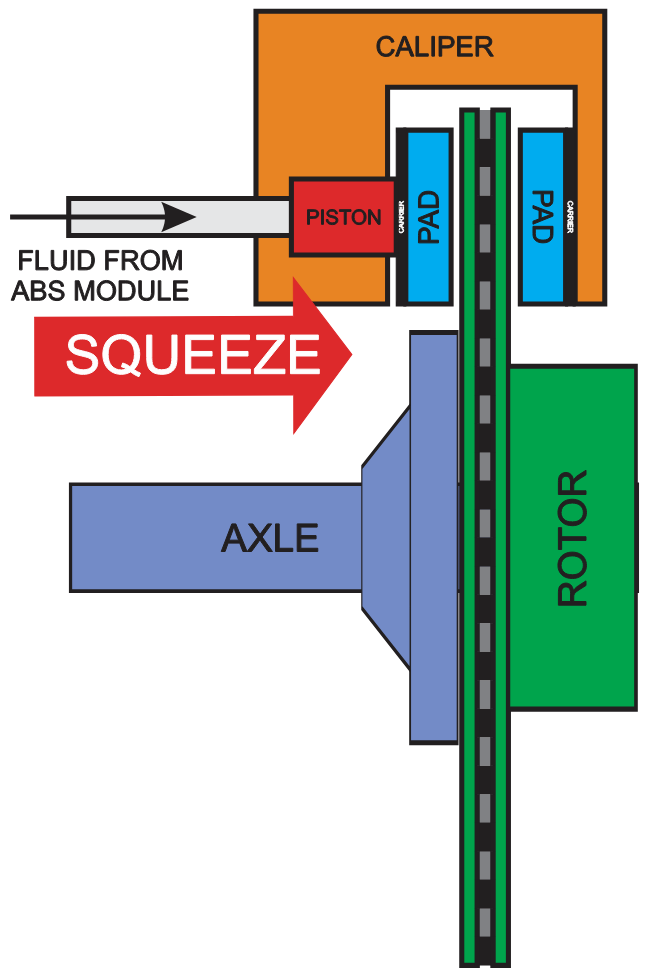 Let’s look a little closer at that disc system. The first thing to notice is our drawing is wrong… we’ve shown the gap between the pads and rotor much larger than the actual gap, because they’re actually set as close as possible to the rotor so there’s the absolute minimum time between pressing the pedal and the actual braking contact. In reality, they’re so close that it’s impossible to slip a piece of paper in the gap! Also, no braking system on any car looks like this. It’s a schematic diagram to show how the system works, so your vehicle will absolutely look different than this! But it’s enough to tell you about all the basic components.
Axle– The axle passes through the rotor and connects to the wheel hub. The rotor connects to the wheel hub itself.
Rotor– The rotor connects to the wheel so when it is clamped between the brake pads the wheel stops turning.
Caliper– The caliper holds all the components that squeeze the pads against the rotor.
Piston– The Piston is the part that moves back and forth to create the squeezing action.
Brake Pads– These are the parts that actually contact the rotor to cause friction, and we’ll talk about them much more below. They’re a buffer between the metal of the rotor and the metal of the carrier they mount to. Without the pads, the metal carrier (which wouldn’t have much stopping friction anyway) would immediately carve grooves into the metal of the rotor and make it unusable.
Brake Pads
There are three kinds of pads, organic (resin and other compounds), semi-metallic (mostly copper or iron), and ceramic. The kind you’ll use depend on your driving style, vehicle weight, and other factors. All brake pads are DISPOSABLE ITEMS; they’re designed to wear away slowly under friction but they ARE designed to wear. YOUR BRAKE PADS MUST BE REPLACED BEFORE THEY WEAR COMPLETELY AWAY. Once the carrier (the part the pad mounts to) touches the rotor your brakes are “metal on metal”, and you are doing SERIOUS damage to the MUCH more expensive brake rotor.
Since they’re so important, let’s look very closely at those pads. Couple important things… We’re just showing one pad and the rotor, but there’s another pad on the other side of the rotor (as in the sketch above) that’s going through the same thing. Also, brakes wear differently depending on vehicle and driver, so any mileage or time we mention are very approximate.
Drawing 1 is your vehicle’s brake system when it’s brand new. The pads and rotors are absolutely smooth and the pads are at full thickness (about 8-10mm for most cars. The little graph above the pad shows the wear depth.) Wear rates vary by vehicle, driving style, and pad composition, but it’s pretty normal to lose about a millimeter of pad thickness for every 4000 miles or so of driving.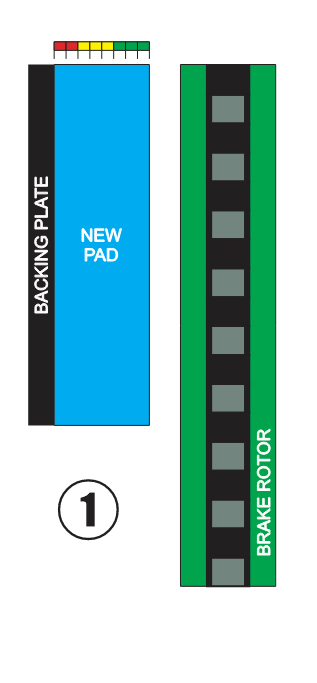 Drawing 2 shows the system after it’s been driven those 4000 miles. You can see the pad has gotten about a millimeter thinner, while the much harder rotor has also worn but not nearly as much. You’ll also notice that small irregularities are starting to develop on the surface (like grooves on a record, if you remember vinyl records), and the patterns will match on both pad and rotor as they grind against each other.
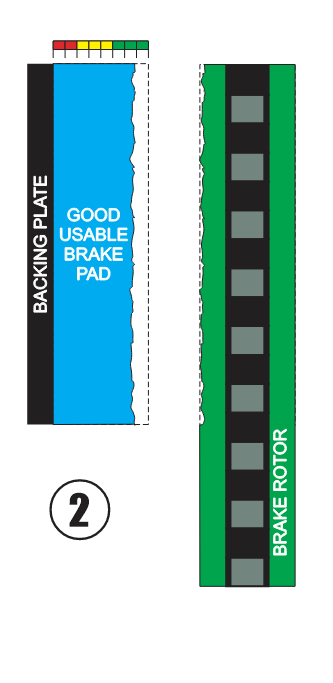 Drawing 3 is after driving about 24,000 miles. The pad has lost 6 millimeters and is down to the discard level. It will continue to work as a brake, but you should replace it AS SOON AS POSSIBLE. Looking closer at the irregularities, you’ll notice that they’ve gotten deeper on both the pad and the rotor (less so on the rotor) but they still match.
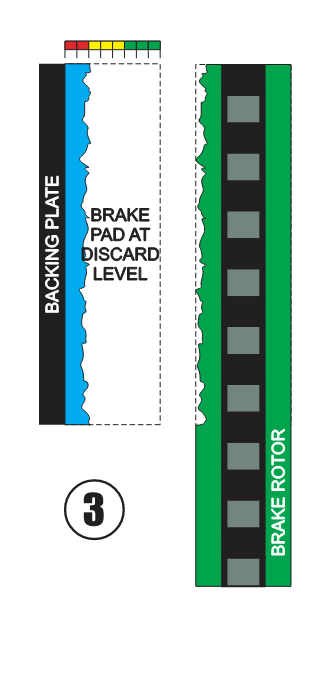 Chances are, if you’re at this level of pad then you called us because “my brakes are making a squealing sound”. This is good and expected! Most people don’t obsessively check their brake pad thickness, so a little piece of metal called a “squealer tab” is exposed when your pads their replacement level. It’s designed to make that annoying squeak and tell you it’s time to replace the pads.
Drawing 4 is your worst-case scenario. The squealer tab has been ground off so there’s no warning anymore, and the pad itself is almost gone. “Metal on metal” is a death sentence for your brakes as the metal of the backing plate grinds into the rotor. This is UNSAFE because your brakes won’t work consistently when you absolutely need them, and EXPENSIVE because you’re doing massive damage every time you press the brake pedal. DON’T EVER GET IN THIS SITUATION!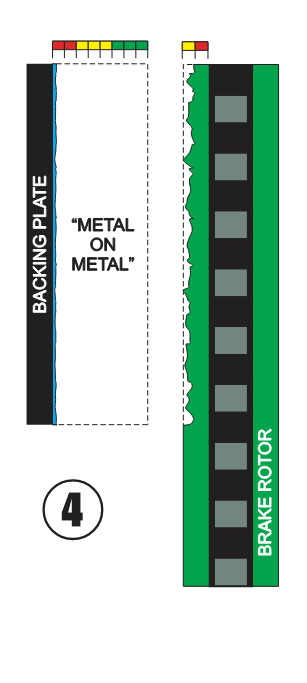 Drawing 5 is the brake system of a relieved driver. The pads have been replaced and are full thickness and smooth, but you’ll notice that the rotor still has a groove pattern from the last set of pads. The brakes will work just fine but it will take a while for the pattern on the rotor to engrave itself perfectly into the material of the pads. When we tell you “make a couple hundred slow, gentle stops to let the brakes settle in”, this is what we’re trying to do… get those grooves matching as gently as possible.
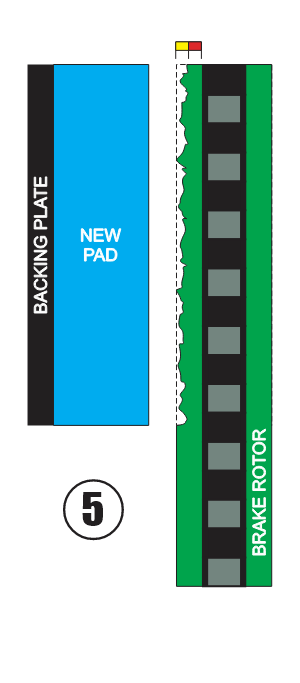
Brake Rotors
Rotors wear more slowly than pads, but they do wear so when we’re checking or changing your pads we’ll be looking at the rotors too.
Let’s look at drawing 5 again. We’ve shown it as a new pad being mounted against a grooved rotor because the grooves weren’t deep enough to require replacement. They’re right on the borderline, but what if they were just a little deeper? Some grooves in the rotor are just fine, but when they get too deep the rotor will have to be resurfaced (smoothed out) to make good contact.
To resurface a rotor, we attach a metal lathe to your rotor and slowly turn it. The lathe scrapes off incredibly thin layers of metal until it’s all down to the same level, as in drawing 6. That’s a nice, smooth surface for the pads to meet, but that’s the last time this rotor can be resurfaced. When the metal gets too thin it can’t absorb the heat of braking as well so the rotor will begin to warp and distort. This will cause uneven contact with the pad and unreliable or noisy braking.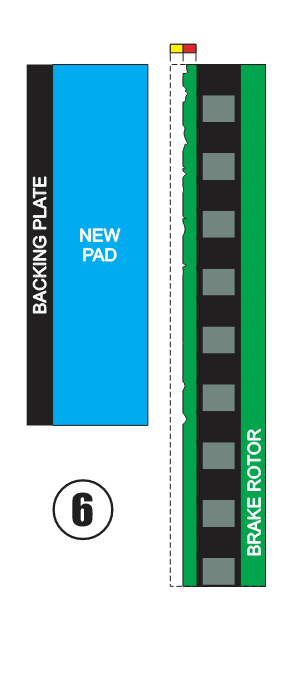
What can go wrong with your brakes
Braking systems are designed to work ABSOLUTELY consistently for many thousands of miles but they’re still subject to failure. Here are some of the most common ways they can fail, and what to look for.
-
- Thin brake pads– Stay on top of pad status by professional inspection at regular intervals. We do this in both our 90-point and Comprehensive inspections, but can always do a brake-specific inspection if you’re experiencing problems. If you haven’t been inspecting then listen for a consistent squealing from the brakes; the warning of the ‘squealer tab’.
- Thin or warped rotors– You’ll feel this most often as a vibration in the pedal or vehicle as you apply the brakes.
- Trapped material– The brakes are pretty well protected but sometimes a small piece of gravel or other material might get trapped inside the caliper or between the pads and rotors. You’ll hear a sound, feel a vibration, or have reduced braking effectiveness.
- Rust– It’s pretty common for brake rotors to develop a light sheen of rust on the surface from dew or atmospheric moisture, causing a loud squeal. This will go away quickly from the first few normal stops of your morning. Heavy rust is rarer but it happens, particularly if you don’t drive the vehicle very often. It may take resurfacing the rotor to remove this kind of rust.
- Stuck caliper/piston– If the piston isn’t moving the brake pads then you don’t have any brakes. It either won’t press against the rotor (unlocked) or won’t release from the rotor (locked). You’ll feel the reduced braking efficiency, but you may also feel a ‘pull’ to one side or the other while braking (an unlocked caliper) or while driving (a locked caliper).
Wheels-off vs Wheels-on inspections
There’s a lot we can tell about your brakes with the wheels on, but for the best brake inspection you have to take the wheels off.
-
- Wheels on– We can “peek” through the wheels to look at the pads and rotors. If your pads are new or mostly new we can see it, and won’t go further unless there’s some other cause to pull the wheels. This is what we typically do in our 90-point inspection.
- Wheels off– With the wheels off, we can get in close and actually measure the pad thickness, evaluate the rotor surface, or look at caliper components. We’ll do this in our Comprehensive Inspection, if we can’t obviously tell the pads are new, if our records show they’re getting near replacement levels, or if you’re experiencing a specific braking problem.
And that’s about it for Brake Basics. You aren’t quite ready to join our Dwyer team of ASE-Certified Technicians, but you should be able to know what to look for in braking problems and know what we’re talking about when we’re advising fixes. And if you still have questions, PLEASE ASK! If you’re in the shop then our Advisors will be glad to answer anything, or if you email a question to us we’ll get back with a detailed (possibly more detailed than you want) answer very soon. But for now, go out there and drive (and STOP!) with confidence!
Digging Deeper
Why Most Modern Cars Stopped Using Drum Brakes, Benjamin Gracias on Jalopnik, Jul 2025
Which Brake Rotor Type Is Best For Your Vehicle? Solid or Vented? Powerstop.com
How to Know When to Replace Your Brakes, Genesis of Schaumburg, Oct 2021
The Evolution of Braking Systems: From Drum to Disc, Gexhaust, Apr 2024
Why Are Drum Brakes Still in Modern Cars?, Mike Hagerty on NAPA Blog, Sep 2018